4. Entering Applications
This is the most important page in the center. A returned policy is an application the carrier kicks back because something was entered wrong: it costs you the commission, delays the client’s coverage, and hurts our standing with the carrier. Almost every one traces to a mistake made in the steps that follow. Follow them exactly and your applications go out complete the first time, and the carrier doesn’t send them back.
First: how to get into the right application
Section titled “First: how to get into the right application”Every application starts in ISM Flex. Entering through ISM Flex is what activates the Freedom Flex 11-month letter (which appears in the app as Financial Security Provider). Enter any other way and you lose that benefit. That’s why the first step never changes.
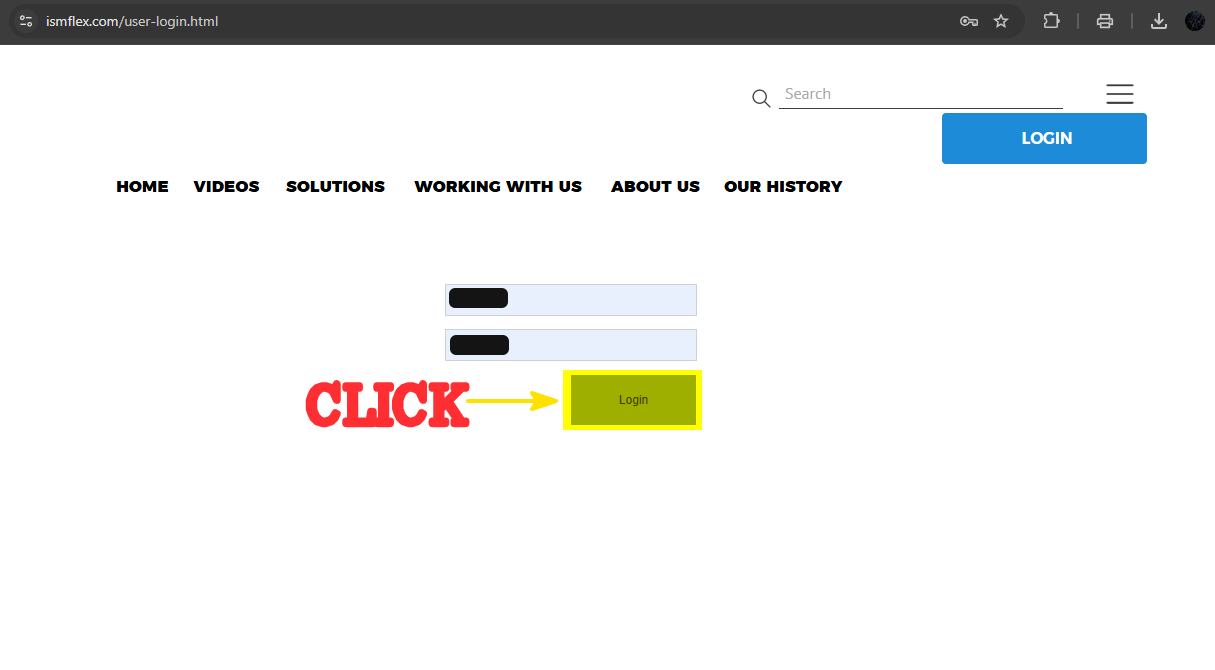
Step 1. Log into ISM Flex
Section titled “Step 1. Log into ISM Flex”Go to ismflex.com and click LOGIN. Enter your agent username and password.
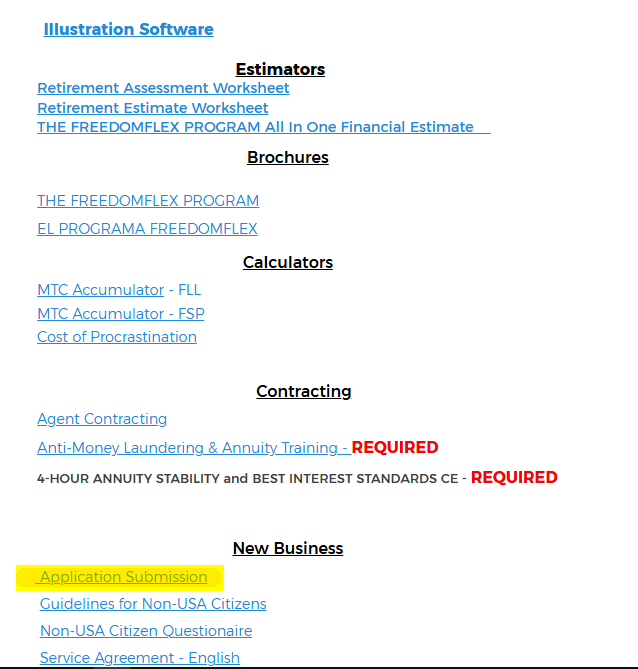
Step 2. Agent Center → New Business → Application Submission
Section titled “Step 2. Agent Center → New Business → Application Submission”In the Agent Center, scroll to the New Business section and click Application Submission.
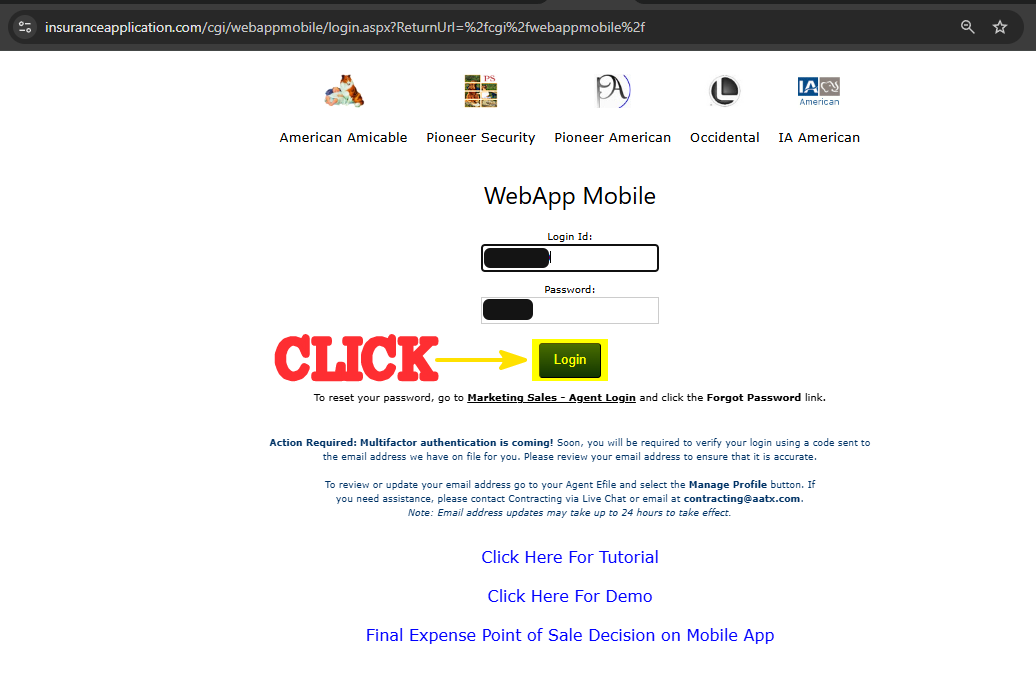
Step 3. Log into WebApp Mobile
Section titled “Step 3. Log into WebApp Mobile”The application portal opens (insuranceapplication.com). Across the top you’ll see the carriers: American Amicable, Pioneer Security, Pioneer American, Occidental, IA American. Enter your Login Id and password, then click Login.
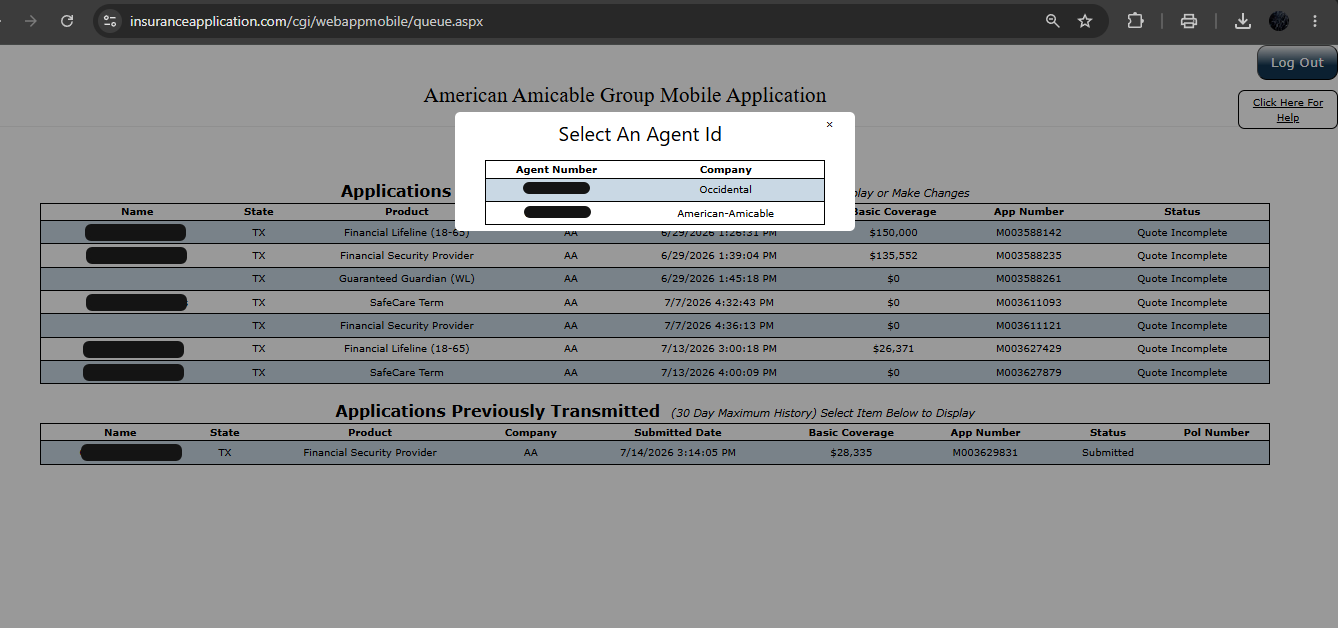
Step 4. Select the Agent Id (the carrier)
Section titled “Step 4. Select the Agent Id (the carrier)”Select An Agent Id appears. Choose the correct carrier:
- American-Amicable for Freedom Flex (Financial Security Provider) and the other AA products.
- Occidental for
[CONFIRM: Occidental product].
Step 5. New Application
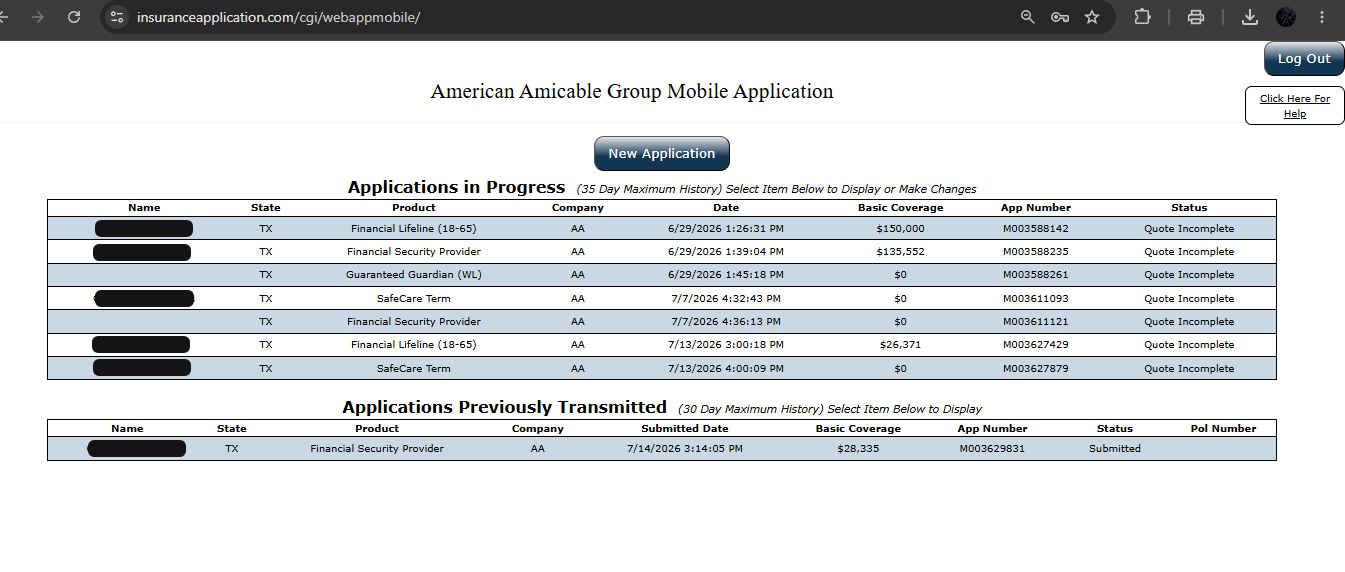
Section titled “Step 5. New Application”On the main screen (American Amicable Group Mobile Application), click New Application. This is also where you see your applications in progress (last 35 days) and already transmitted (last 30 days).
Step 6. Select the product
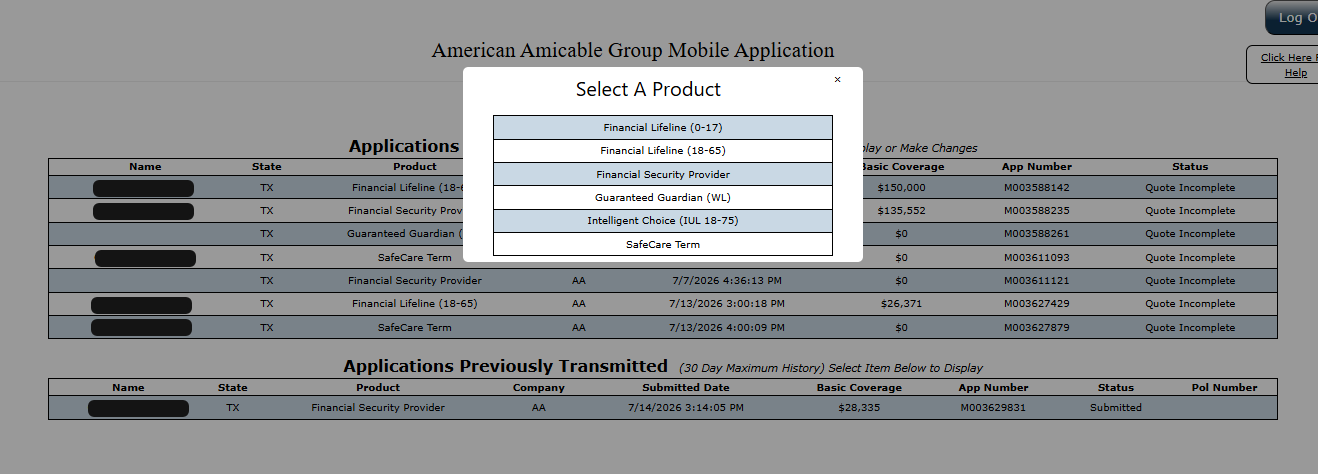
Section titled “Step 6. Select the product”Select A Product appears. Choose the product:
- Financial Security Provider = Freedom Flex (the one with the 11-month letter).
- Others: Financial Lifeline (0-17 / 18-65), Guaranteed Guardian (WL), Intelligent Choice (IUL 18-75), SafeCare Term.
From here the application runs screen by screen. Freedom Flex has its own steps (payment method, annuity options, and the setup that activates the 11-month letter); those are covered below and, in detail, in the step-by-step guide.
The application, screen by screen
Section titled “The application, screen by screen”From here every policy runs the same path. The captures in this section come from a demo application (Financial Lifeline, “John Doe”), but these screens are the same across the other products. Freedom Flex also has its own product screens; those are covered in the Freedom Flex section.
How to read the screen
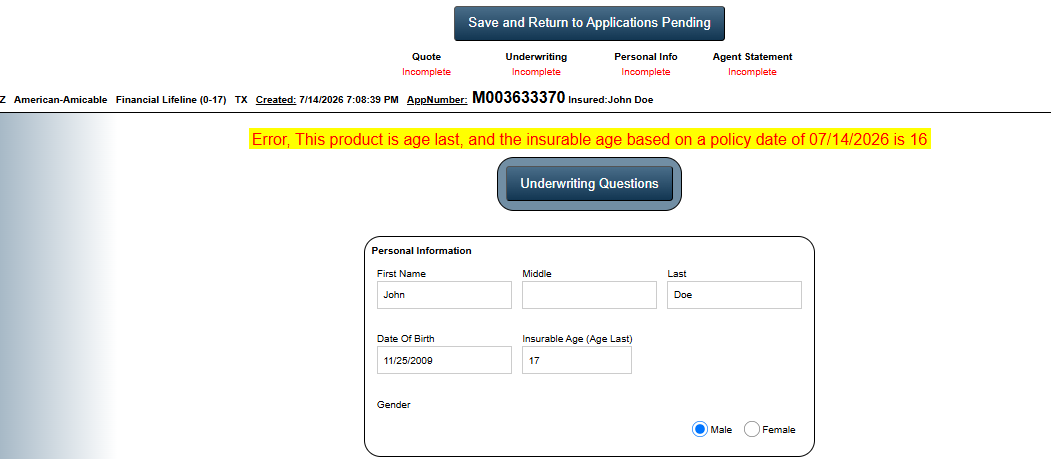
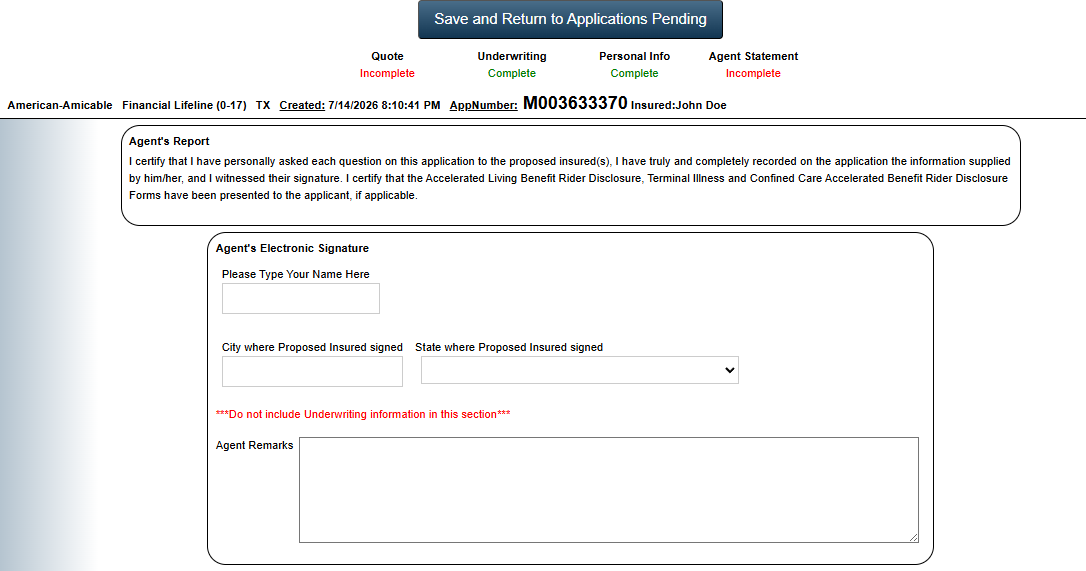
Section titled “How to read the screen”Across the top of every screen are four stages: Quote, Underwriting, Personal Info, and Agent Statement. Each one shows whether it is Incomplete (in red) or Complete (in green).
The application cannot be signed until all four stages show Complete.
- A red “Req” next to a field means it’s required and empty. The system flags it for you; you don’t have to guess.
- Save and Return to Applications Pending, the blue button at the top, saves what you’ve entered and returns you to your list. Use it if you have to stop partway.
- On the Underwriting and Personal Info screens you can move ahead without filling every “Req” field by using the “Here” link at the bottom of the screen; that saves your progress too. Even so, every required field has to be answered before the application can be signed.
Step 7. Honesty Pledge
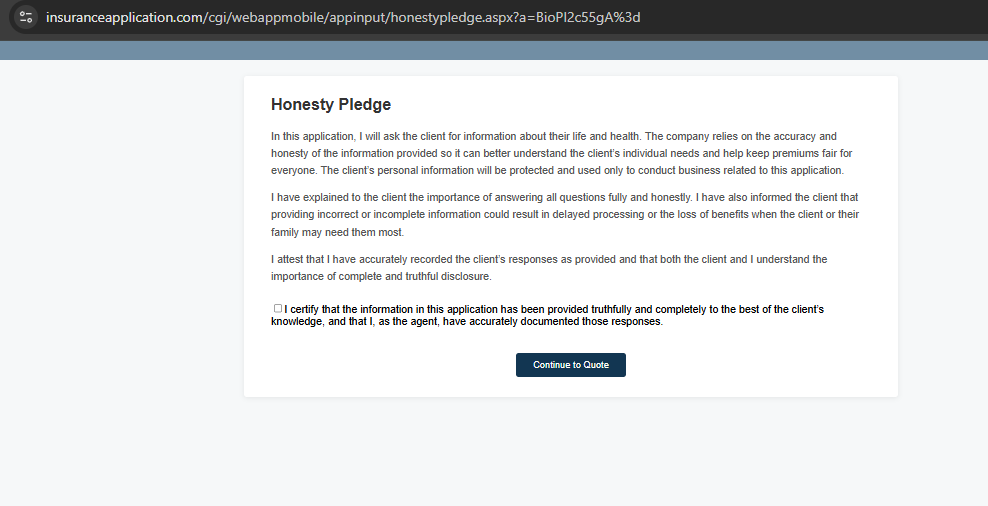
Section titled “Step 7. Honesty Pledge”Before the quote comes the Honesty Pledge. It’s your certification that you explained to the client how important it is to answer everything truthfully, and that you recorded their responses exactly as given. Check the box and press Continue to Quote.
Step 8. Quote: basics and amount
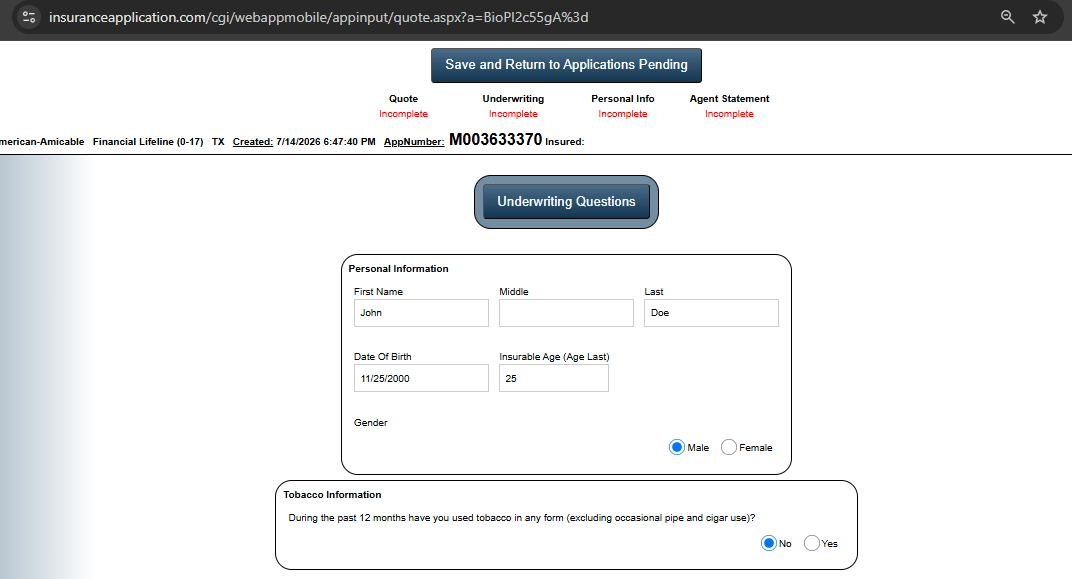
Section titled “Step 8. Quote: basics and amount”This is where the quote happens. Two blocks:
Personal Information: name (First / Middle / Last), Date Of Birth, Insurable Age (Age Last), and gender. Tobacco Information: tobacco use in the last 12 months.
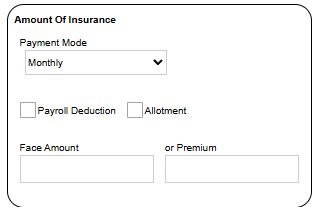
Amount Of Insurance: the Payment Mode (monthly, etc.), the Payroll Deduction and Allotment checkboxes, and the Face Amount or the Premium (fill one; the system calculates the other).
Step 9. Quote & Illustration
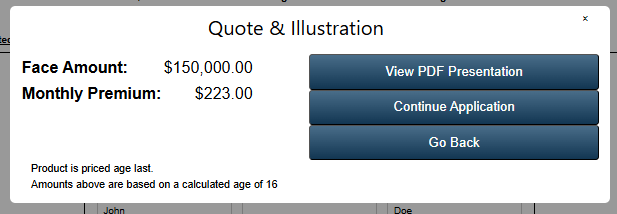
Section titled “Step 9. Quote & Illustration”Once it quotes, the Quote & Illustration window shows the Face Amount and the Monthly Premium. Three options: View PDF Presentation (the client-facing presentation), Continue Application, or Go Back to fix something.
Show the presentation before you move on. This is the moment to confirm with the client that the amount and the premium are the ones they agreed to.
Step 10. Underwriting: health questions
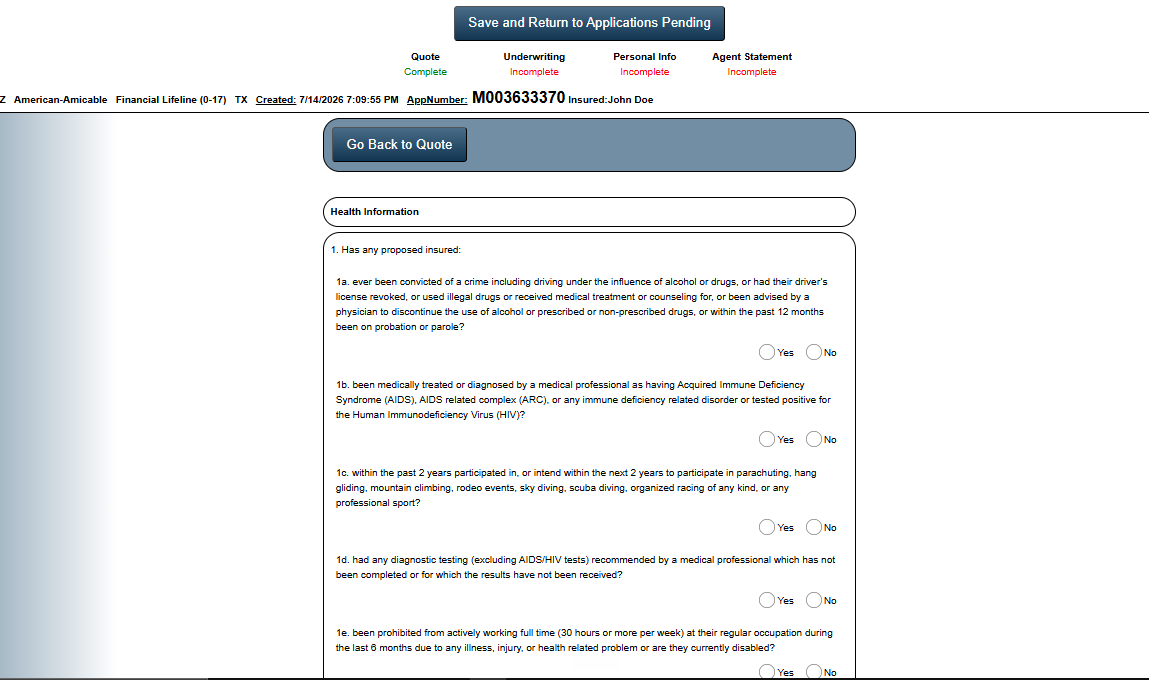
Section titled “Step 10. Underwriting: health questions”Answer the Health Information Questions. They’re numbered (1a, 1b, 1c…) and cover history, conditions, and hospitalizations. No blanks: an unanswered question is one of the five causes of a return.
Step 11. Personal Info
Section titled “Step 11. Personal Info”The longest screen. Take your time here.
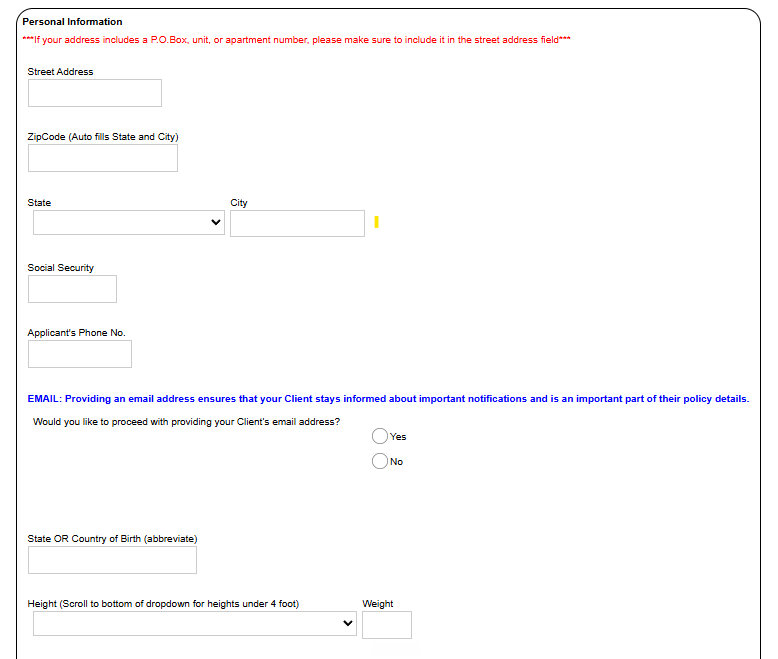
- Street Address: if the address has a P.O. Box, unit, or apartment number, it goes in the street address field itself. The screen warns you in red.
- ZipCode: auto-fills State and City. Check that what it filled is right.
- Social Security and Applicant’s Phone No.
- Email: the system asks whether you want to capture the client’s email. Capture it: that’s how their policy notices reach them.
- State OR Country of Birth: abbreviated.
- Height: the dropdown is long; for heights under 4 foot you have to scroll to the bottom of the list. Weight.
- Occupation, Employer Name and Address, Hire Date (mm/yy), Annual Salary.
- Personal Physician Name and address.
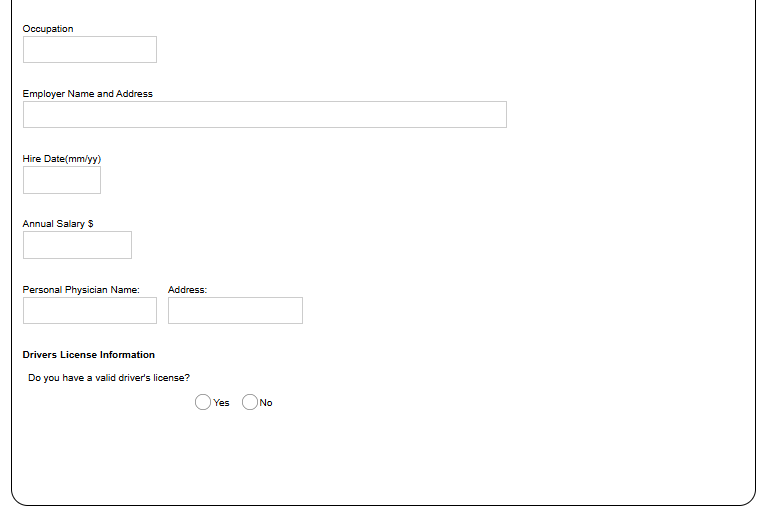
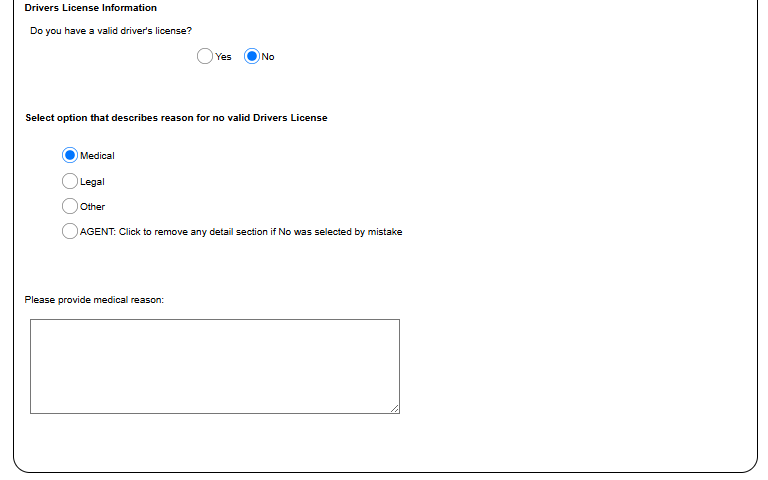
Driver’s license. If the client does not have a valid license, the system opens the reason options: Medical, Legal, or Other, and asks for the reason in writing. If you marked No by mistake, use the “AGENT: Click to remove any detail section if No was selected by mistake” option to close that section.
Step 12. Owner and Payor
Section titled “Step 12. Owner and Payor”Two short questions: is the Owner the proposed insured? and is the Payor the proposed insured? Answer No and a section opens to capture that person.

Step 13. Beneficiaries
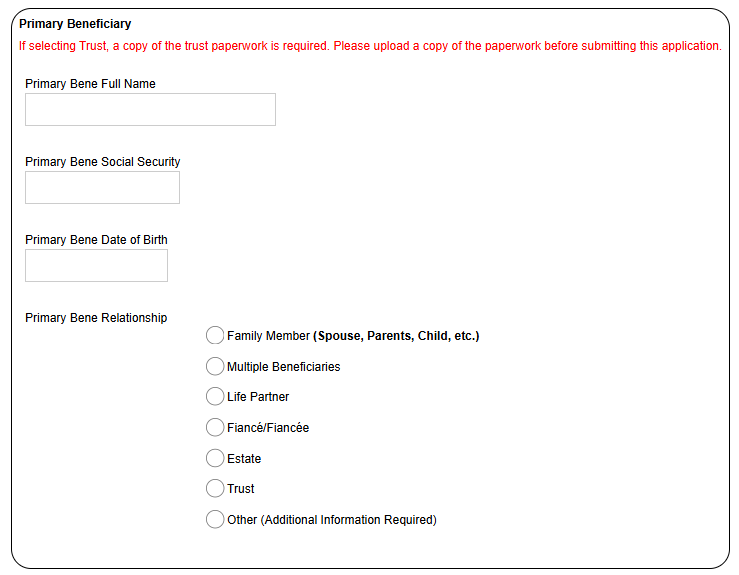
Section titled “Step 13. Beneficiaries”For the Primary Beneficiary you capture full name, Social Security, date of birth, and relationship: Family Member, Multiple Beneficiaries, Life Partner, Fiancé/Fiancée, Estate, Trust, or Other.
Capture the contingent beneficiary too whenever the client wants one.
Step 14. Existing coverage and replacement
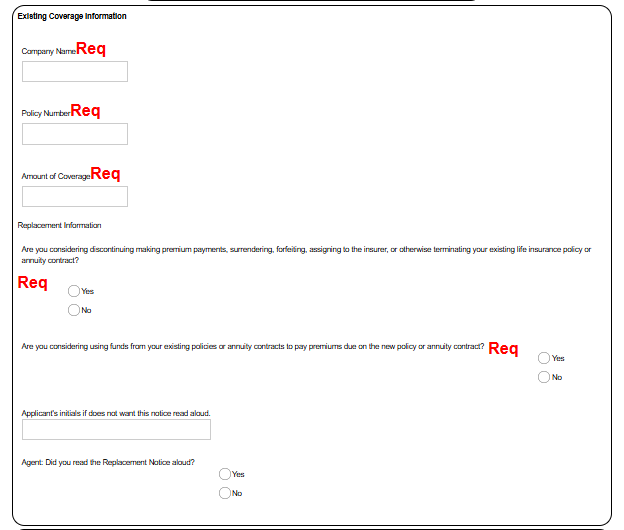
Section titled “Step 14. Existing coverage and replacement”This is where cause-of-return #2 gets decided. If the client already has coverage, you capture Company Name, Policy Number, and Amount of Coverage (all three required), plus two replacement questions.
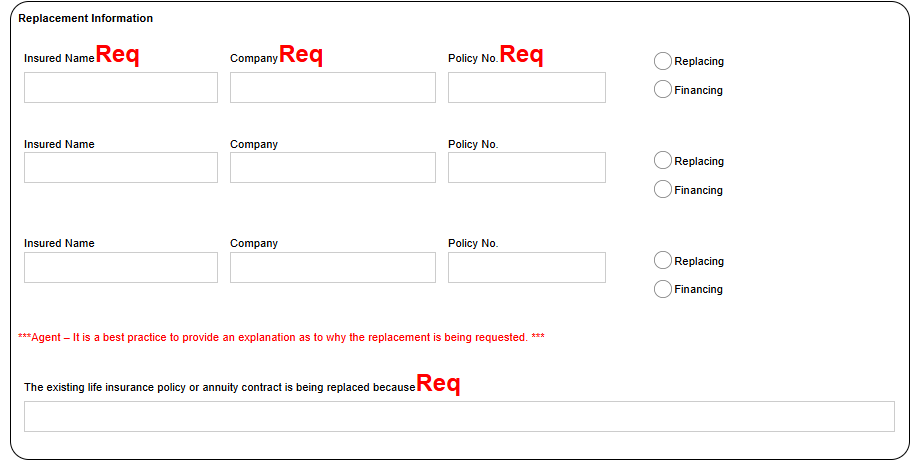
If the new policy replaces an existing one, the Replacement Information screen asks, for each policy: Insured Name, Company, Policy No., and whether it’s Replacing or Financing. Plus a required field: “The existing life insurance policy or annuity contract is being replaced because…”. The screen tells you in red that it’s best practice to explain why the replacement is being requested. Explain it.
Step 15. Policy Instructions
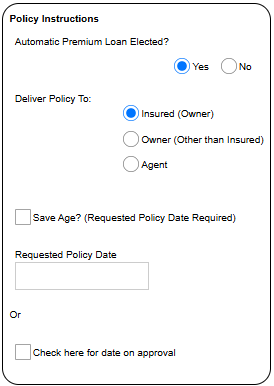
Section titled “Step 15. Policy Instructions”- Automatic Premium Loan Elected?
- Deliver Policy To: Insured (Owner), Owner (Other than Insured), or Agent.
- Save Age?: check it and the Requested Policy Date becomes required.
- Requested Policy Date, or else Check here for date on approval.
Step 16. Payment
Section titled “Step 16. Payment”First the Payment Type: Bank Draft, Direct, Payroll Deduction, or Allotment.
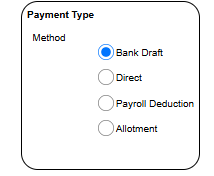
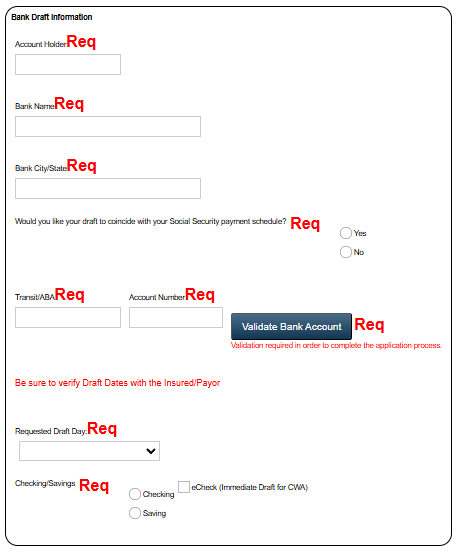
For Bank Draft, you capture: Account Holder, Bank Name, Bank City/State, Transit/ABA, Account Number, Requested Draft Day, and Checking / Saving. It also asks whether the draft should coincide with the client’s Social Security payment schedule.
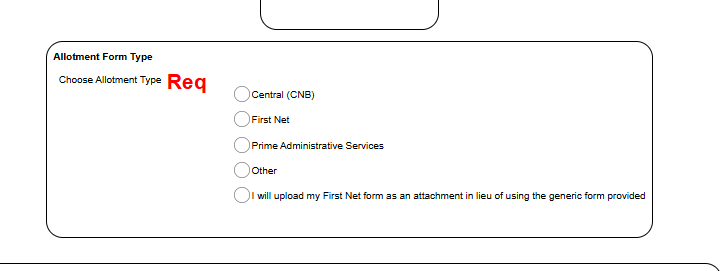
For Allotment, pick the Allotment Form Type: Central (CNB), First Net, Prime Administrative Services, or Other. You can also upload your own First Net form instead of using the generic one.
Step 17. Agent Statement
Section titled “Step 17. Agent Statement”The Agent’s Report is your certification: that you personally asked the client every question, recorded their answers truthfully, and witnessed their signature. Then the Agent’s Electronic Signature: type your name, plus the city and state where the proposed insured signed.
The Replacement Questions show up in this same stage: whether the proposed insured has existing life or disability insurance or an annuity, and whether this policy is meant to replace it.
Step 18. Signatures and submit
Section titled “Step 18. Signatures and submit”Once all four stages read Complete, move to signatures. From your Applications in Progress list, select the application and use the menu:
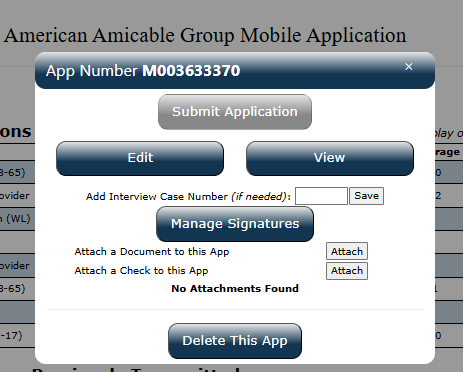
- Manage Signatures: to sign.
- Edit / View.
- Attach a Document / Attach a Check: this is where the voided check or any extra document gets uploaded.
- Submit Application: only enabled once everything is ready.
Every application in the list carries its status: PENDING, SIGS NEEDED, or READY TO SUBMIT. Once submitted it moves to Applications Previously Transmitted and can no longer be edited.
Before you submit: the pre-flight checklist
Section titled “Before you submit: the pre-flight checklist”Run this list on every application before you hit submit. Do not skip it because you’re in a hurry. Being in a hurry is how policies get returned.
Client identity
Section titled “Client identity”- Full legal name spelled exactly as it appears on their ID
- Date of birth matches the ID (a wrong DOB changes the rate and voids the app)
- Social Security number entered and double-checked digit by digit
- Current physical address (not a P.O. box where the carrier won’t allow it)
Coverage details
Section titled “Coverage details”- Product and face amount match what you actually presented and the client agreed to
- Term length or product option is the one quoted
- Rate class matches the health answers (don’t submit “Preferred” if the health questions don’t support it)
Beneficiary
Section titled “Beneficiary”- Beneficiary full legal name and relationship entered
- Beneficiary percentages add up to 100%
- A contingent beneficiary listed when the client wants one
Health & underwriting
Section titled “Health & underwriting”- Every health question answered: no blanks
- Medications and conditions listed honestly and completely
- Height and weight entered
Payment: the #1 cause of returns
Section titled “Payment: the #1 cause of returns”- Bank routing and account number entered correctly and re-read
- First payment (draft) date set to a day funds will actually be there: a returned first draft is the single most common reason a policy lapses in month one
- Payment mode (monthly / annual) matches what the client agreed to
Replacement
Section titled “Replacement”- If this policy replaces existing coverage, the replacement form is completed and attached. A missing replacement form is an automatic kickback.
Submit, then confirm
Section titled “Submit, then confirm”- Submit through the carrier’s e-app portal, not a paper app, whenever the carrier offers it. E-apps catch missing fields before they become returns.
- Get the confirmation / policy number and log it in your prospect follow-up.
- Watch for a carrier request. If underwriting needs more info, they email within a few days. Respond fast: a stalled request becomes a declined application.
If a policy still comes back
Section titled “If a policy still comes back”- Read the return reason carefully: the carrier states exactly what’s wrong.
- Fix only what they flagged and resubmit; don’t rewrite the whole thing.
- Log what caused it. If the same reason shows up twice, tell your partner so we fix the process, not just the one app.
The returned-policy cheat sheet
Section titled “The returned-policy cheat sheet”The five things that cause almost every return:
- Wrong first-payment date: client’s account was empty on the draft day.
- Missing replacement form: replaced an existing policy without the form.
- DOB or SSN typo: one wrong digit.
- Blank health question: an unanswered field the carrier won’t waive.
- Beneficiary percentages that don’t total 100%.
Freedom Flex (Financial Security Provider): key points
Section titled “Freedom Flex (Financial Security Provider): key points”The screen-by-screen guide for the Freedom Flex product gets added once we have captures from that application. For now, what you can never forget on a Freedom Flex:
- Freedom Flex is issued through American Amicable (not Occidental). In the app it appears as Financial Security Provider.
- The 11-month letter: it’s activated by entering through ISM Flex and taking the American Benefits path (payroll deduction, employer AA, group number 100673).
- Who qualifies for the payroll program: it’s open to the public. The OBA option used to be required to write a Freedom Flex; it isn’t anymore.
- Requested policy date: leave a buffer or pick the following month to avoid a double draft. On a quick turnaround, warn the client they may see two drafts close together (for example the 15th and again on the 1st).
What the 11-month letter is, and what it isn’t
Section titled “What the 11-month letter is, and what it isn’t”The letter doesn’t open any account. It’s a choice the client has to make, and it’s on a clock.
Around month 11, the carrier sends the client a letter asking where the Growth portion of their payment should accumulate starting in year two. It gives three options:
- The Annuity Rider on their own policy. Guaranteed interest, no commissions, no fees, no surrender charges, and no minimums.
- Another accumulation vehicle, outside ISM and the carrier. The client gets instructions to request a prospectus and file their own application. The letter asks for three things: a $250 first contribution, a $25 monthly minimum, and a $250 minimum balance at whatever institution the client chooses.
- An investment account the client already has (mutual fund or other). You need that account’s details: institution, contact, and account number.
The annuity options
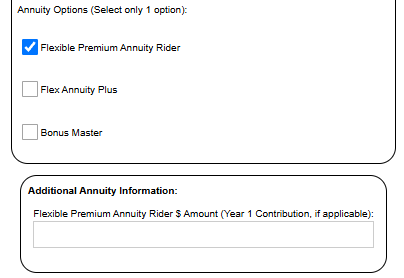
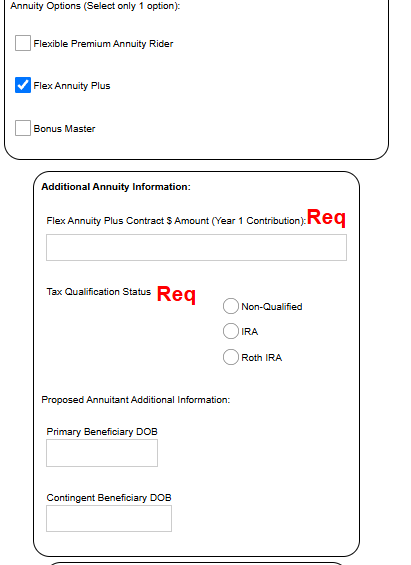
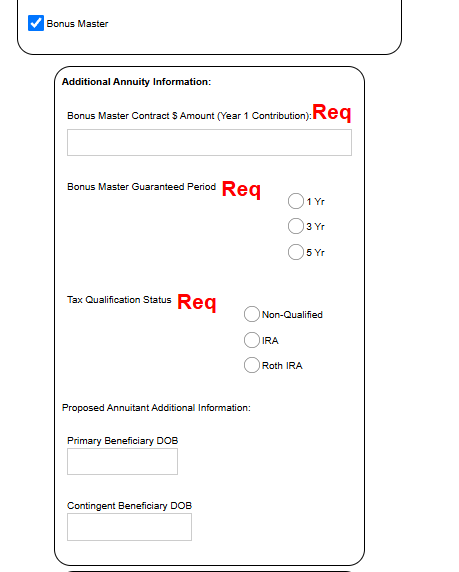
Section titled “The annuity options”They live in the Annuity Options block, and it says Select only 1 option: you pick one. Each one opens its own Additional Annuity Information block, and what it asks for changes depending on which you picked.
Flexible Premium Annuity Rider (FPAR)
Section titled “Flexible Premium Annuity Rider (FPAR)”The lightest one to fill out: it only opens the amount (Year 1 contribution) field, and the label itself says “if applicable”.
It doesn’t ask for Tax Qualification Status, and that isn’t an oversight in the screen. The Statement of Understanding says it plainly: this rider cannot be issued on a tax qualified basis.
Flex Annuity Plus
Section titled “Flex Annuity Plus”It requires:
- Flex Annuity Plus Contract $ Amount (Year 1 contribution)
- Tax Qualification Status: Non-Qualified, IRA, or Roth IRA
Plus the primary and contingent beneficiary dates of birth for the proposed annuitant.
Minimum contribution: $15.00 per month. That’s a requirement on the form, not a suggestion.
Bonus Master
Section titled “Bonus Master”What sets it apart: the guaranteed period locks in the initial interest rate for the term the client picks: 1, 3, or 5 years. That’s all it adds over Flex Annuity Plus.
It requires, all mandatory:
- Bonus Master Contract $ Amount (Year 1 contribution)
- Bonus Master Guaranteed Period: 1, 3, or 5 years
- Tax Qualification Status: Non-Qualified, IRA, or Roth IRA
Plus the primary and contingent beneficiary dates of birth.
Minimum contribution: $15.00 per month, same as Flex Annuity Plus.
The Annuity Suitability Questionnaire
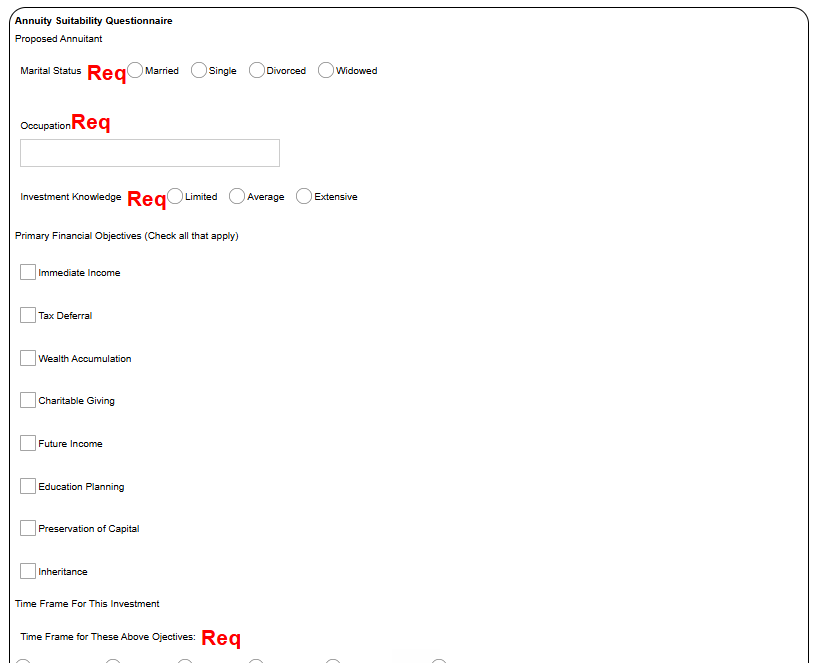
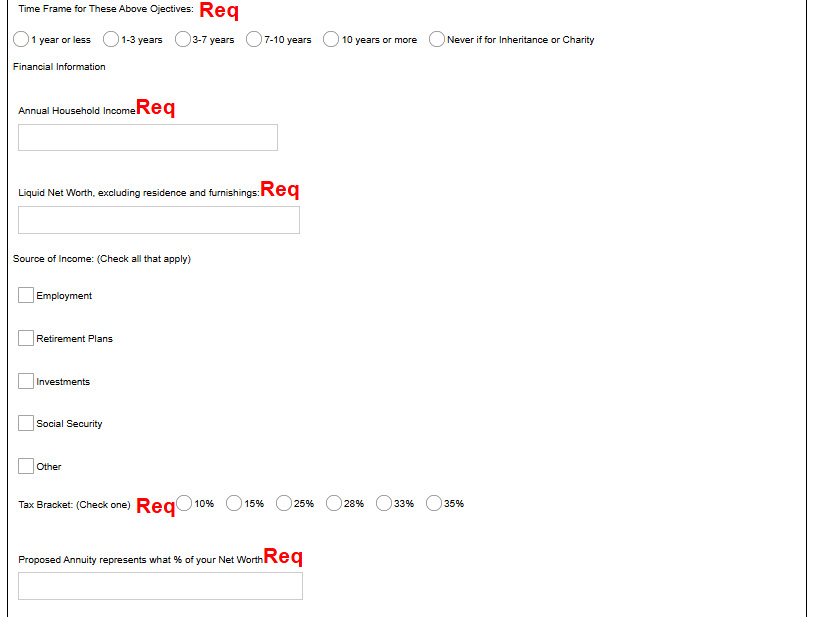
Section titled “The Annuity Suitability Questionnaire”With an annuity, the application opens the Annuity Suitability Questionnaire. It’s what establishes that the annuity is right for the client. Nearly all of it is required, and this isn’t the place to answer for the client or to approximate: this is what backs up the sale if anyone reviews it later.
For the proposed annuitant: Marital Status, Occupation, and Investment Knowledge (Limited, Average, Extensive). Then the Primary Financial Objectives (check all that apply): Immediate Income, Tax Deferral, Wealth Accumulation, Charitable Giving, Future Income, Education Planning, Preservation of Capital, Inheritance. And the time frame for those objectives: 1 year or less, 1-3, 3-7, 7-10, 10 or more, or Never if for Inheritance or Charity.
Financial Information: Annual Household Income, Liquid Net Worth (excluding residence and furnishings), Source of Income (Employment, Retirement Plans, Investments, Social Security, Other), Tax Bracket (10, 15, 25, 28, 33, or 35%), and what % of their net worth the proposed annuity represents.
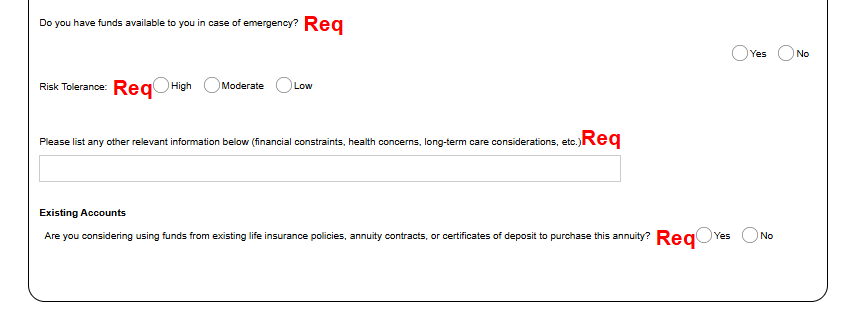
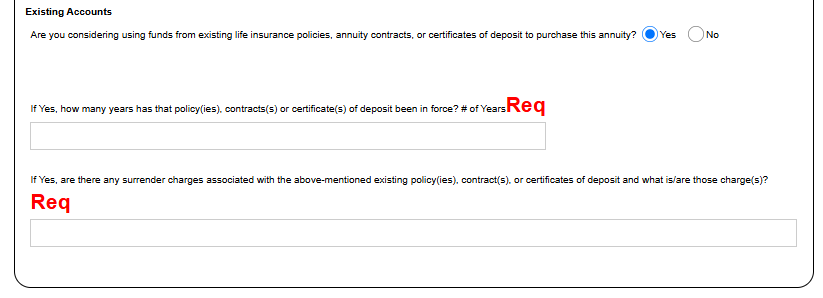
Then: whether they have funds available in an emergency, their Risk Tolerance (High, Moderate, Low), and a required field for any other relevant information (financial constraints, health concerns, long-term care considerations). Fill that one in properly; it’s where the file explains the client.
Next step
Section titled “Next step”Application submitted and logged? Set the first follow-up in your Prospect Follow-Up system.